 Click to go straight to the Guide
I’ve been lifting Manual Actions ever since Google first introduced its range of human-controlled penalties, back in 2012. During the intermittent decade I’ve helped dozens of companies on both sides of the Atlantic get their rankings back and get your online business back on track.
In other words, I’ve done this a lot…
Dealing with a Google Manual Action for Hacked Content on WordPress is a challenging process
Note: Although this penalty recovery tutorial is geared towards WordPress, the steps outlined will largely apply to any Content Management System with very little variation.
For most site owners the first indication that their site has been hacked will usually arrive in one of two ways:
Request a Call-Back
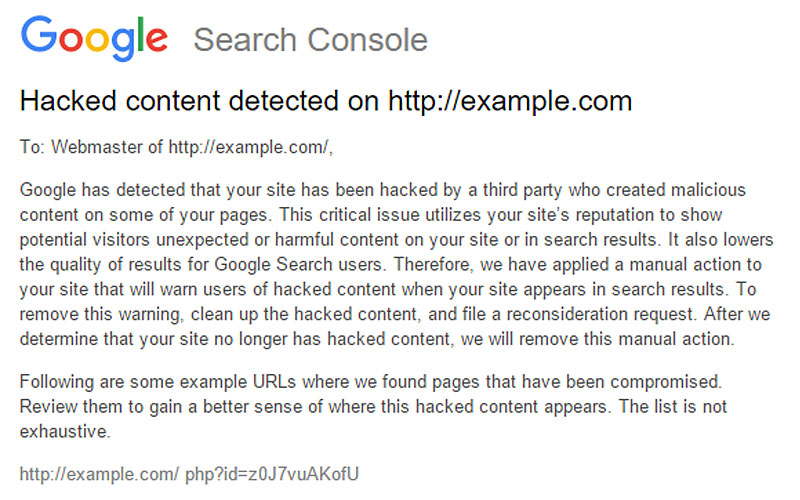
1. Google Search Console
When a manual action for hacked content is issued, Google Search Console will send out an alert to that effect, notifying all site owners of the problem. These notifications look something like this:
2. User/Customer Feedback
A lot of the time, a site’s users will beat Google Search Console to the punch, by sending messages, asking business owners or site administrators why the website is trying to sell them Viagra, or somesuch, depending on how the malicious action manifests itself on the public-facing website.
Having received some kind of notice that there’s something amiss leads us to step one of this tutorial:
Confirm that YOUR SITE HAS ACTUALLY BEEN HACKED
 False Positives can and do happen:
Although a hack or other malicious breach will likely be the cause behind Google’s alarm or your visitors’ complaints, there’s a high enough number of false positives to warrant checking whether there’s actually been an intrusion, before rushing headlong into remedial action.
Although a hack or other malicious breach will likely be the cause behind Google’s alarm or your visitors’ complaints, there’s a high enough number of false positives to warrant checking whether there’s actually been an intrusion, before rushing headlong into remedial action.
For example, Google Search Console has been known to flag legitimate code variations as malicious, on numerous past occasions, some as recently as October 2023. Network activity from your server, or temporary server glitches can also lead to false positives.
Note that this is more common if your site is using a shared hosting package.
Misinterpretation of legitimate non-malicious behavior is another common reason for sites being flagged as harmful, without any hacker interference, as is user generated content. I’ve known Google to get all sweaty and shaky about users dropping code snippets into comment streams, without that code either being malicious, or ever implemented by the website itself.
Also be sure to check that all the site’s themes and plugins are up to date, since outdated components can not only cause false positives, but also constitute serious security vulnerabilities for your WordPress installation.
Checking if your site has been hacked involves three basic actions:
- Check Google Search Console
Check to see if anything’s being flagged in the “Security and Manual Actions” section of your search console dashboard.
- Check your Website Manually for Malicious Behavior
This is best done from an incognito browser tab. Things to check for are strange ads, suspicious links, unusual redirects, and basically anything your site does which it shouldn’t be doing.
It’s also a good idea to check your posts and pages for any content which shouldn’t exist to begin with, as well as your user accounts for anyone who doesn’t belong there. - Run a Google Search for your Website
Check for your website’s address directly, as well as terms you know you should be ranking for. You’re looking for unfamiliar page names/titles, strange page descriptions, and basically anything else that looks out of place.
If your site behaves in any strange manner, if it returns weird search results, or if you see content/users that shouldn’t be part of the site, it’s time to move to the next step:
2. Start Checking your Website In-Depth
This is where normal users start wandering into the weeds, so to speak, because some of the steps outlined below start to become quite technical.
If you’re having problems understanding any of the information given, it’s time to consider hiring a specialist to do the job on your behalf. Of course we are always ready to assist, but any competent technical webmaster with a solid knowledge of WordPress, Scripting, and FTP should be able to carry out these checks for you.
- Check your Website using a reputable Security Plugin
My personal weapon of choice is Wordfence, though there are other competent options available, such as CleanTalk or Defender Security. The plugin’s free version does a good job scanning for problems. However, with the free versions, the threat database is only refreshed once a month, while the paid version updates in real-time, so you may want to consider paying for a license¹. - Run a Security Headers Check
This checks if your site is implementing proper security headers. Numerous online tools are available for this task, including Domsignal and Genelify. These tools will highlight any flaws and misconfigurations, and provide you with a place to start plugging holes in your site’s setup. - Manually Review your Website’s Files and Folders
Access your site’s files via an FTP Client, like Filezilla, or through your web host’s file manager. Look for anything with a strange name, paying particular attention to anything suspicious in the wp-content and wp-includes files:
Also examine the .htaccess file for strange redirects and wp-config.php file for unfamiliar code and strange database connections. - Check your Server Logs and Server Resource Monitor
Analyzing your site’s server logs should already be a regular part of your company’s SEO efforts, since server logs can provide invaluable information when coupled with a competent analytics package. However, the sad fact is that most SEOs and site owners are blissfully unaware that server logs exist in the first place, let alone their importance to troubleshooting either SEO or other problems.
Meanwhile, the simple fact is that log analysis is as tedious as it is crucial. There are, however, some open-source tools out there that remove much of the tedium from the analysis process.
¹ Quite frankly, if you’ve been running a commercial WordPress site without any paid security setup, I would have to ask “Why would you do such a thing?”
3. The Cleanup Process
 While there are tools to help you through the cleanup process, it’s best to take a manual approach to verify the removal of any malicious presence from your WordPress installation. It will take time for Google to reestablish trust following a hacked website manual action. And the process will be prolonged unnecessarily, if you file a reconsideration request without your site being 100% clean.
With that firmly in mind, let’s move on to the individual steps of the cleanup process.
- Backup your Website and Isolate it from the Internet
Running a site backup after WordPress has been hacked is a little like closing the barn door after the horse has bolted. Nevertheless, it’s important to back everything up, not least because you might inadvertently break a crucial component file while trying to disinfect it, and in those cases it’s handy to have a backup so you can start over.
With that said, ideally speaking you should already be running a two-week rolling backup regime that allows you to roll your compromised installation back to a clean state, up to 14 days earlier. Unfortunately the percentage of websites running such a protocol is comparatively tiny, so we’ll ignore it for the purposes of this tutorial.
I’ve compiled a list of the individual steps you need to take, to isolate and backup your WordPress installation, here. - Let your Web Host know about the Situation
It’s not uncommon for WordPress breaches to affect several (or even all) sites on a server, so giving your web host the heads up about what’s happening can help you and them get things cleaned up much more quickly and easily.
Also, depending on your host and hosting setup, they may have a clean backup of your installation, even if you didn’t have a backup regime in place prior to the malicious breach. - Run a Comprehensive Malware Scan
With access to your site restricted, run a malware scan on it, with one of the security plugins mentioned above. This will help you to shortlist infected files, and may even be able to clean them up for you. - Manually Check your WordPress Files
With the Malware scan complete, manually check the following files for unexpected modifications. It’s a necessary step of the overall process, even if your security plugin says it’s cleaned everything up. In cases like this it’s ALWAYS better to be safe than sorry.
Further, this part is actually not as difficult as it might sound. Basically, all you need is a fresh, clean WordPress installation, to give yourself an uninfected set of files to compare your own to.
I’ve compiled a list of the core WordPress files you need to manually check for infection/modification, here. - Deal with your Website’s Themes and Plugins
Statistically, speaking unused and outdated theme and plugin files account for around 50% of all WordPress breaches, so it’s crucial that you firstly keep everything you use up-to-date, and secondly that you remove all unused themes and plugins from your WordPress installation altogether.
With this done, you need to check through your /wp-content/ directory for signs of tampering. Look for any suspicious filenames, as well as for files with unusual file sizes. This can once again be accomplished by comparing filenames, directory contents, and file sizes to those from a fresh, clean installation.
Lastly, here’s a non-exhaustive list of specifics you need to be on the lookout for, when examining your WordPress installation’s files for signs of intrusion or tampering.
Note that I will be adding more details to this tutorial as time passes, to build a more comprehensive resource.
Once you’re sure that all trace of malicious code has been removed from your WordPress installation, it’s time to restore your cleaned-up website.
4. Stopping the WordPress Hack/Intrusion from Reoccurring
After making sure you’ve cleaned house, and that your WordPress installation is free of any malicious intrusion, the first step is to change your passwords, as well as those of your users.
Pro-Tip: Now would be a good time to re-examine your users’ assigned roles. By simply downgrading “Admin” users who do not require administrator privileges to “Editor,” you’ll considerably reduce your site’s risk profile, from compromised user hardware and browsers.
Also be sure to change FTP, database, and hosting account passwords, making sure you use unique, strong passwords for each separate service.
Next, you need to seriously consider setting up an additional layer of security by implementing a “2 Factor Authentication” setup. This can be done quickly and easily through the above-mentioned security plugins, or through a separate plugin such as “Two Factor Authentication.”
It’s also worth looking at setting up a “Web Application Firewall.” You’ve probably encountered one in the past couple of days, looking something like this:

While web application firewalls are undoubtedly a great enhancement to your site’s security, they also add an element of delay to your visitors’ user experience. This is something you’ll need to consider carefully, as different user groups will react differently to additional delays when trying to access content.
If you haven’t done so yet, now would be a good time to remove those unused themes and plugins I was talking about earlier.
And finally, run another complete scan with your security plugin and set up real-time scanning. If your plugin does not support real-time scanning, get a different one.
Final Thoughts:
It’s also a good idea to enable debug logging in your WordPress installation. This will create a record of errors you can monitor to check for serious future anomalies. You can find instructions on how to enable debug logging here.
Always remember: Eternal vigilance is the price of not getting hacked again.
Contact us today for a free consultation, or if you need help lifting a ‘Google Hacked Website’ manual action.